There’s a gap that most creators know well. There’s a huge distance between the visual you have and the visual you actually need. A product shot that’s technically fine but aesthetically flat. A portrait with the right subject but the wrong background. A still frame from a video that’s compositionally strong but stylistically off-brand.
Starting from scratch every time that gap appears is expensive and slow. Image-to-image AI is the tool that closes it. Rather than generating visuals from a blank canvas, it starts with something you already have and transforms it, keeping what works, changing what doesn’t, and doing it in seconds. Here’s how to use it well.
What Image-to-Image Actually Does
Image-to-image AI takes an existing visual as its foundation and uses it as a structural reference to generate something new. Unlike text-to-image generation (which works purely from a written description), image-to-image has both a prompt and a source image to work from simultaneously.
The model reads the source image at a deep level: analyzing composition, spatial relationships, lighting, color distribution, depth, and the relationship between foreground and background elements. It then uses that analysis as a constraint on what it generates, so the output shares structural DNA with the input while being visually transformed according to your text prompt.
The degree of transformation is usually controllable through a strength or influence slider: low strength keeps the output close to the source, high strength gives the model more freedom to reinterpret it.
The practical result is that you’re not replacing your original visual, just remixing it into something that fits your actual need.
Step One: Choose the Right Source Image
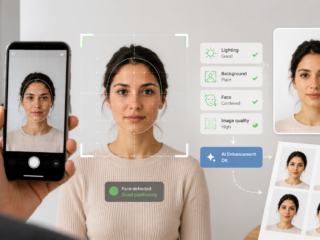
The quality of your source image is the single biggest factor in what comes back. A well-composed, properly lit image with a clear subject gives the model the most useful structural information to work with. A cluttered, blurry, or poorly exposed source limits what the AI can do with it.
That said, “right” doesn’t always mean technically perfect. What matters is that the composition serves your goal. If you’re using image-to-image to change a background, the foreground subject needs to be clearly defined.
Before uploading, ask: what element of this image do I want to keep, and what do I want to change? The answer shapes how you set up the generation.
Step Two: Write a Prompt That Describes the Transformation
This is where most people underinvest, and it’s where the biggest quality gains are available. The text prompt in image-to-image doesn’t just describe what you want to see, but the transformation you want to apply to what already exists.
Be specific about what should change. If you’re shifting the environment, describe the new setting in detail. If you’re applying a style transfer, name the aesthetic explicitly. Similarly, if you want to change the color treatment, describe the palette rather than just the color name.
The prompt and the source image work together. Precision in the prompt is the lever you control most directly.
Step Three: Set the Transformation Strength
Most image-to-image tools give you control over how aggressively the model transforms the source image. This setting is one of the most impactful and least-used controls in the workflow.
With low strength, the output stays very close to the source. Fine details, textures, and overall composition are largely preserved. Medium strength gives a genuine transformation while retaining the structural bones of the source. This is the sweet spot for most use cases.
With high strength, the model takes significant creative liberty. The source image becomes a loose reference rather than a structural constraint. Match the strength setting to what you actually want to achieve.
What Creators Are Actually Using It For
Here’s where image-to-image workflows are put into real production pipelines by creators:
The Iterate-Fast Mindset
The most important habit to build with image-to-image is iteration. A first generation is rarely the final result. Instead, it’s a starting point that shows you what direction the model is taking and what adjustments will close the gap between that and what you actually want.
Adjust the prompt, shift the strength setting, try a different source crop, or swap the model if your platform offers multiple options. Each iteration is fast enough that you can move through five or six variations in the time it used to take to brief a designer on a single revision. That speed is the real advantage! And it’s not just the quality of any individual output, but the speed at which you can find the right output.
Key Takeaways
Image-to-image AI doesn’t replace your existing visuals, but unlocks their true potential. What you have becomes raw material for what you need. The workflow is learnable quickly, the iteration cycle is fast, and the gap between the visual you have and the visual you actually want just got a lot easier to close.